
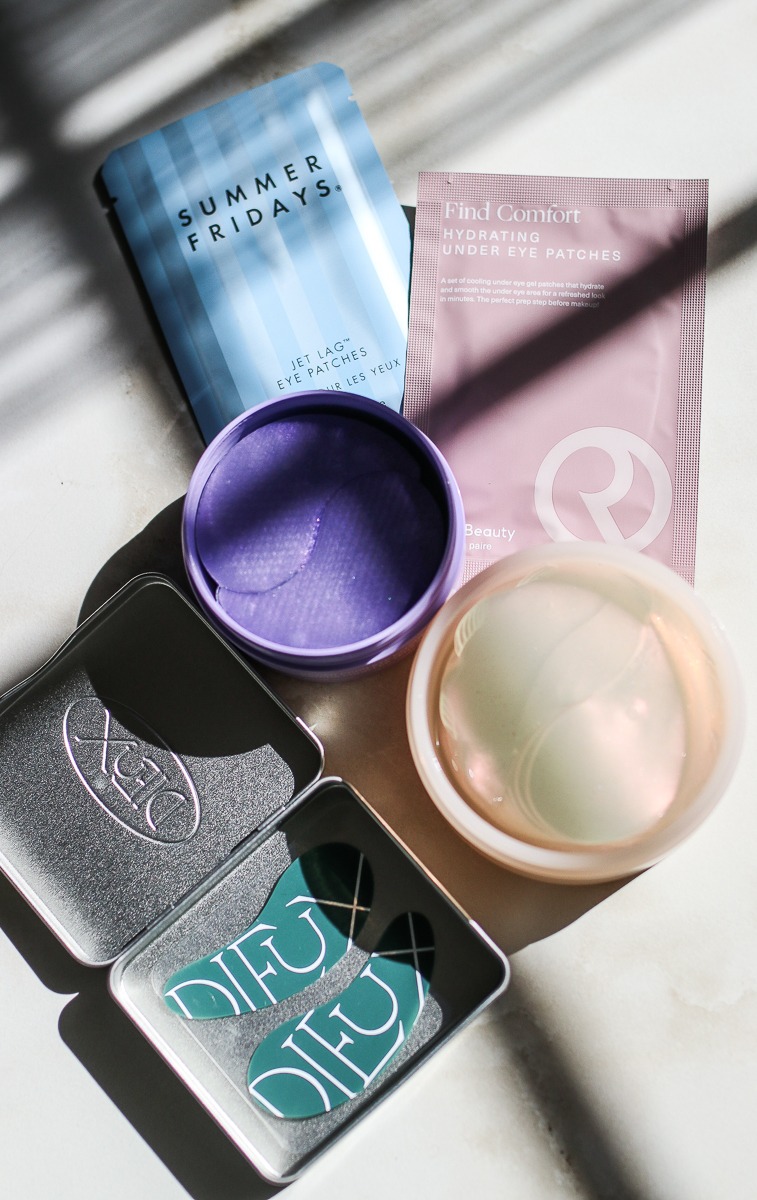
I wear under eye patches nearly every single day. Is that necessary to do? Probably not but I honestly LOVE the way they feel and make my under eye area look. Especially in the morning when I’m trying to wake myself up and get ready, applying under eye patches help me feel a bit more alert. Most eye patches are designed to help wake up a puffy, tired eye area, especially in the morning, but honestly you can use them any time of the day if you want. Talking about puffiness specifically, it’s important to find eye patches that have key ingredients like caffeine and hyaluronic acid. Some of the other factors that I look for in an eye patch are something that helps to cool, hydrate, fits well and has a texture I enjoy. I’ve tested a range of eye patch options, from drugstore to luxury to reusable, so hopefully you can find the right one for your budget and skin.
What Are The Best Under Eye Patches For Puffiness
I have a bunch of different eye patches that I regularly keep in rotation just because I love to switch things up. Some are definitely a bit pricier so I save them for special occasions or only to use once a week while others are more budget friendly so I can apply one every single morning. Below is a quick synopsis of my top picks my category followed by a more in-depth review of each. I also included some popular eye patches that I don’t recommend or feel were not worth repurchasing which I also included at the end of this list.
Best overall under eye patch: Summer Fridays Jet Leg Patches. From the fit, to the texture, to how they make my under eye area look/feel, these are my current favorite.
Best budget under eye patch: Beauty of Joseon Revive Under Eye Patches for Wrinkles & De-puffing. 30 pairs for $20 makes them less than $1 per pair!
Best reusable under eye patch: Dieux Forever Eye Mask is truly the best reusable option out there.
Summer Fridays Jet Lag Eye Patches
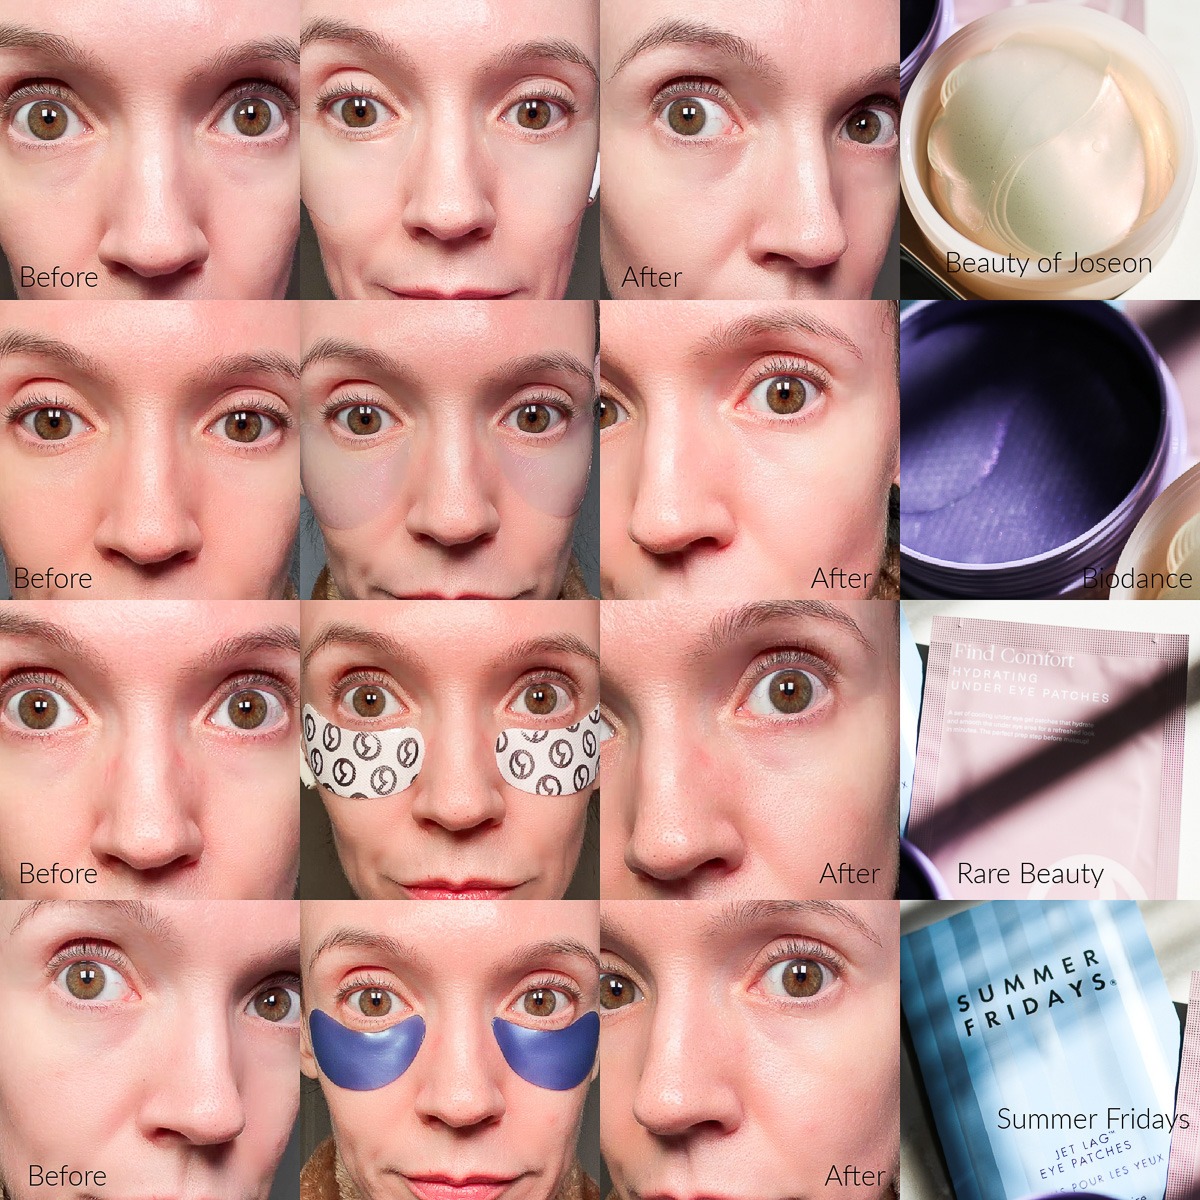
The first thing that set these apart from other eye patches I’ve used is the shape. I LOVE the shape of these eye patches. They are designed to fit the eye more easily so I can get them super close to my lash line while still covering the rest of my under eye area perfectly. These are made from a hydrogel material which helps them adhere to the skin without slipping down as you wear them. Another great feature of the hydrogel material is that it feels instantly cooling on the skin. The main ingredients to help with depuffing are caffeine and peptides while additional ingredients like niacinamide, cucumber extract and panthenol help to soothe and glycerin + hylauronic acid add a boost of hydration. While these are a regular repurchase for me, I try to use them sparingly because they are on the pricier side at $24 for 6 pairs. I wasn’t sure they were worth it when I first bought them, but after using them for one time, I was hooked. I LOVED the way my under eye area looked. In addition to the slight depuffing, my eyes looked bright and hydrated.
Beauty of Joseon Revive Under Eye Patches for Wrinkles & De-Puffing
What made me fall in love with these eye patches are their versatility! The brand specifies that they can be used under the eyes, on the forehead, on smile lines or on the neck to help add hydration and smooth the look of fine lines. The depuffing aspect of these is not as prominent but I find that putting them in the refrigerator to cool before applying them makes a huge difference in reducing puffiness. The main focus of these eye patches are to help smooth and firm the look of wrinkles which is why they are formulated with retinal. In addition, there are multiple key ingredients such as panax ginseng root water, collagen, ceramides and peptides which which help intensely hydrate and provide moisture. The shape of them are large so they can cover a bigger area which is great if you want to use them on other parts of the face rather than just putting them under the eyes. They are the least expensive out of the entire group at $20 for 30 pairs!
Biodance Caviar PDRN Eye Patches for Depuffing & Under-Eye Bags
I am a huge fan of Biodance products so I had a feeling I would enjoy these PDRN eye patches as much as I do the other Biodance products I use regularly. As with most eye patches designed to help depuff, they contain caffeine which reduces that puffiness slightly. I really love the intensely hydrated glow these leave under the eyes which really makes me look so much more awake. That comes from the PDRN in the formula while the probiotic exosomes help to strengthen the delicate skin around the eyes. You get 30 patches in a tub for $23 which makes them one of the most affordable ones in this list. My only issue with these are the shape which is the traditional shape for most under eye patches. I find that this universal shape can be hard to fit under my eye and I have to move it around until I get it exactly how I want it. I do wish more companies would begin to rethink the shape of their eye patches.
Dieux Forever Eye Mask
For those who want to prioritize sustainability and cut down on having to constantly repurchase eye masks, there is the Dieux Forever Eye Mask. This is a reusable under eye mask made from medical-grade silicone that you can use with whatever eye serum or eye cream you want underneath. Typically one set of eye masks can last about a year when used regularly. The best way to utilize these is to apply your favorite depuffing eye serum or eye cream under the eyes, apply the masks and leave on for 20 minutes. Personally, I have been able to leave these on for more than an hour until the product was completely absorbed which was amazing. Once you are done, simply wash off the patches with warm water and place them back in the tin they come in. Another great way to use them is to wear them while doing your eye makeup to prevent any product fallout. They are priced at $25 and can be reused up to one year.
Abib Collagen Eye Patches
These eye patches have been a long time favorite that I have repurchased numerous times. They are $23 for 30 pairs which makes them incredibly affordable. The texture is similar to the Biodance PDRN patches because they have a slippery gel like feel to them, which can be a turn off for some people. I don’t mind this texture but I do make sure to scrape off any excess serum on them before I put them on so aren’t too wet. As with most of the other eye patches in this list, they contain caffeine which will help to depuff. In addition, they contain a form of collagen to help smooth the look of fine lines, jericho rose to help soothe + provide moisture and niacinamide for helping to brighten. My only criticism is the traditional eye patch shape which looks like a large comma. LOL But I love how they make my eyes feel and look so I overlook it.
Rare Beauty by Selena Gomez Find Comfort Hydrating Under Eye Patches
These came highly recommended to me and I was pleasantly surprised with how much I loved them. Formulated with caffeine to help depuff, they also contain green tea extract which calms and soothes the skin plus hyaluronic acid to add hydration. These are wrapped individually rather than all stacked together in a tub so if that is something you prefer, this is a great option. Priced at $25 for 8 pairs, it is a tad steep but great to save for using once a week or special occasions. I LOVE the shape of these because they can fit perfectly under my eyes without having to readjust them a million times. If you dislike the hydrogel or jelly-like texture that so many eye masks have, these could be a better fit since they are made from a textured fabric. No slimy feeling or wet serum to wipe off and they manage to still be incredibly refreshing when you put them on. There is no slippage to worry about because they under eye patches adhere immediately and DO NOT MOVE until you take them off.
There are a few eye patches I’ve tested which I was not a fan of but often get questions about so I thought I would give a quick review on each and why I didn’t love them.
Grace and Stella Energizing Under Eye Masks
I went through an entire box of these eye masks because they always get a ton of hype but sadly they would not stay on my face. They are priced very affordably at $26 for $24 pairs and the colors they come in are so cute but they would slip nearly every time I wore them. I was constantly adjusting them back under my eyes so I felt like I was never getting the mask to stay there long enough to really work well. Made out of the same hydrogel material that the Summer Fridays are, they did not manage to remain in place as well as the Summer Fridays ones did. For that reason, I never repurchased them and never recommend them.
111Skin Celestial Black Diamond Eye Masks
A very pricey eye mask but one that I feel is sadly not worth the money. I tried these a few years ago and had high hopes because I’ve seen a lot of good reviews. They are designed to help firm and brighten which they did but not better than most of the other eye masks that are a fraction of the price. These are $120 for 8 masks which felt way too expensive for something so temporary. The three key ingredients are retinol, hyaluronic acid and niacinamide which are pretty standard ingredients for most eye masks. The shape is nice because they fit easily under the eyes but they did slip down for me numerous times. After I removed the masks, my eyes look hydrated and bright but nothing more than that. I could not justify spending the money for these and do not recommend them.
Wander Beauty Baggage Claim Eye Masks
Another popular eye mask that have tons of great reviews but were not a hit for me. They are moderately priced at $26 for 6 pairs but at the higher end of the ones I have in this list. Designed to help brighten, hydrate and depuff with ingredients like hyaluronic acid, aloe leaf extract, and various amino acid extracts, these are very similar in formulation to many others I’ve tried. My main issue with them is the foil texture they is on the outer portion of the mask. I understand that the outer layer of foil is supposed to help retain heat so that no moisture evaporates while they are on the face. But I found them hard to apply and had to fix many times to get them to lay flat. The foil would bunch up or crinkle making it a hassle to get them on evenly. Not a huge issue but when there are so many other options out there, I did not want to repurchase.
Rhode Peptide Eye Prep Eye Masks
I love so many of Rhode’s products but these fell into the “ok” category. Nice but honestly nothing special. They have all the traditional ingredients designed to help depuff and hydrate like caffeine and peptides though the addition of glycerin is not something I’ve seen in many eye patches but love that they added this for hydration! These feel dry almost when you first take them out. There is no liquid and just have a cooling hydrogel layer that adheres to the face. The outside layer is fabric though much like the Rare Beauty but the Rare Beauty ones feel more saturated in a way. The upside to these is they DO NOT MOVE. They almost adhere to the face like a sticker so you need to be careful when removing them so you don’t pull too hard at your skin. The shape is one that I prefer because they fit easily under the eyes but the price point feels high for what you get. They are $25 for 6 eye patches. I’m not a “heck no” about these as I am the other three in this list but I have not repurchased them.
Do Under Eye Patches Work For Puffiness?
Trying to figure out how to depuff eyes in the morning can be a challenging, but eye patches can definitely temporarily reduce the look of puffiness through cooling and ingredients like caffeine. Additionally, they can help add hydration with ingredients like hyaluronic acid and glycerin. But the results are short term, not permanent. Issues like ongoing puffiness from things like allergies, salt, sleep, or genetics needs to be addressed at the cause.
How To Choose the Right Under Eye Patches?
For Morning Puffiness
If your biggest concern is addressing morning puffiness, look for eye patches with caffeine in them. Additionally, those made from a cooling hydrogel texture are the best option.
For Dryness
If your biggest concern is addressing dryness under the eyes, look for eye patches with ingredients like hyaluronic acid, glycerin and ceramides.
For Dark Circles
If you are struggling with dark circles under the eyes, it’s best to look for eye patches that contain ingredients like niacinamide and vitamin c. It’s worth noting however, that most eye patches won’t reduce dark circles permanently and can only help to temporarily brighten or illuminate. If you really want to brighten that area, you will need a good concealer or even a lightweight brightener such as the Rare Beauty Under Eye Brightener.
For Fine Lines
Fine lines are hard to treat with an eye patch but can help to soften the look of them temporarily. Look for eye patches formulated with peptides or bakuchiol which is a retinol-like alternative.
For Sensitive Skin
If you have sensitive skin, it’s best to look for under eye patches that are fragrance-free.
Reusable vs. Single Use
If you are focused on sustainability, choose a reusable eye patch to use with your favorite eye serum or eye cream. You can often boost the results of your favorite formulas by applying a slightly thicker layer and applying a reusable eye patch over top to help the product absorb better.
How To Use Under Eye Patches For the Best Results
- Apply them to clean skin before eye cream.
- Store them in the fridge for extra cooling.
- Leaving them on for the recommended time (typically 10 to 30 minutes)
- Pat in the leftover serum.
- Use them a few times a week or before big events.
I personally love to apply my under eye patches right after getting up in the morning. They help to wake me up as I make breakfast and pack my son’s lunch. I tend to leave the on longer when I’m busy doing other things so I always get the most of out each eye patch.



Comments